In the fast-moving world of data and technology in general, addressing tech debts is an integral part of any organization. It is important not only to stay ahead in the competition but also to keep your infrastructure updated. Besides, it helps us address compliance and security issues which arise with an ever-evolving world. This is especially true in the space of information systems, which is changing rapidly. Furthermore, the change has accelerated with the emergence of cloud technologies like Microsoft Azure, easing the effort of hosting and upgrading different services. One of the key services from Azure data stack is Azure Data Lake Store. Moreover, the data lake store’s latest version is Azure Data Lake Gen2.
Also Read: Challenges in Modern Data Processing
However, addressing tech debt comes with its own set of challenges. It might bring in a lot of code changes, thus leading to partial/complete redevelopment or even redesigning of systems. Accordingly, in Azure Data Lake Gen2, the systems that might be affected primarily are administrative and ETL/ELT systems.
As far as ETL/ELT systems are concerned, the Azure Data Factory is the primary service used. ADF can connect to ADLS Gen2 with Managed Identity. We have written two articles on the same i.e. Managed Identity between Azure Data Factory and Azure storage(RBAC) and Azure Data Lake Gen2 Managed Identity using Access Control Lists. Furthermore, we will cover changes to Azure Databricks in some other article.
Powershell changes for Azure Data Lake Gen2
The other systems that may be affected are the ones including administrative tasks like file archival, renaming, Access Control etc. Generally, Powershell is used for these tasks.
The first and foremost point of difference between Azure Data Lake Gen1 and Gen2 is that the PowerShell cmdlets for the latter (ADLS Gen2) are not present in Azure Rm module. Hence all the cmdlets for Gen2 are present in Az module and more specifically Az.Storage submodule. Hence the first cmdlet we will talk about is the Az.Storage Installation.
Install-Module Az.Storage -Repository PSGallery -Force
Once installed, connect to the tenant in which your Azure Data Lake gen2 lies.
Connect-AzAccount
Every tenant has multiple subscriptions. Hence, the next step is to select the subscriptions.
Select-AzSubscription -SubscriptionId <subscription-id>
Authorization
The next important step is authorization to Azure Data Lake Gen2. There are two ways of obtaining authorization viz. either by using Azure Active Directory or through Storage Account Key. We will elaborate on the Storage Account key here.
$storageAccount = Get-AzStorageAccount -ResourceGroupName "<resource-group-name>" -AccountName "<storage-account-name>"
$ctx = $storageAccount.Context
Please note that this is the most important step. All the cmdlets further will use the variable $ctx i.e. the storage account context for authorization.
Accessing a file
Before performing any manipulations, you should access the file using simple a cmdlet as follows:
$filesystemName = "my-file-system"
$dirname = "my-directory/"
$dir = Get-AzDataLakeGen2Item -Context $ctx -FileSystem $filesystemName -Path $dirname
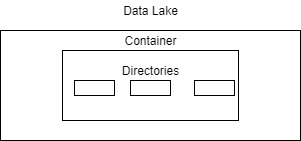
Note that the ‘$filesystemName’ is the container in which your directories and subdirectories exist.
The Get-AzDataLakeGen2Item returns an object. All the properties of the object can be accessed using the ‘.’ operator:
$dir.ACL
$dir.Permissions
Accessing Files in a Folder
In the real world scenarios, we like to list down files in a directory and subdirectories. The below cmdlet helps us do the same:
Get-AzDataLakeGen2ChildItem -FileSystem "filesystem1"

Results:
FileSystem Name: filesystem1

Path IsDirectory Length LastModified Permissions Owner Group
---- ----------- ------ ------------ ----------- ----- -----
dir1 True 2020-03-13 13:07:34Z rwxr-x--- $superuser $superuser
dir2 True 2020-03-23 09:28:36Z rwxr-x--- $superuser $superuser
Now, if there are subdirectories involved, you need to iterate through them to find files at the lowest level. The ‘Recurse’ parameter in the cmdlet helps us achieve that.
Get-AzDataLakeGen2ChildItem -FileSystem "filesystem1" -Path "dir1/" -Recurse -FetchProperty

Result:
FileSystem Name: filesystem1

Path IsDirectory Length LastModified Permissions Owner Group
---- ----------- ------ ------------ ----------- ----- -----
dir1/dir3 True 2020-03-23 09:34:31Z rwx---rwx $superuser $superuser
dir1/file1 False 1024 2020-03-23 09:29:18Z rwx---rwx $superuser $superuser
dir1/testfile_1K_0 False 1024 2020-03-23 09:29:21Z rw-r----- $superuser $superuser
The first result shows that it recurses through directories and subdirectories. However, if you want to avoid the list of directories, you need to add a condition ‘$_.IsDirectory -eq False’.
Get-AzDataLakeGen2ChildItem -Context $ctx -FileSystem "filesystem1" -Path "dir1/" -Recurse | foreach{
if($_.IsDirectory -eq $false){...processing...}
For more on recurse refer to this link.
Moving or Renaming Files
Another important admin tasks with Azure Data Lake Gen2 is moving or renaming files. These tasks help us archive historical/cold files essential to modern analytical applications. Interestingly, moving and renaming use the same cmdlet.
$filesystemName = "my-file-system"
$dirname = "my-directory/"
$dirname2 = "my-new-directory/"
Move-AzDataLakeGen2Item -Context $ctx -FileSystem $filesystemName -Path $dirname -DestFileSystem $filesystemName -DestPath $dirname2
For renaming, replace the directories with filenames
$dirname = “my-directory/file.csv”
$dirname2 = “my-directory/renamed_file.csv”
ACL
Another important admin task is managing Access Control Lists (ACL). The documentation by Microsoft gives sufficient details for the same. Here is the link.
Conclusion
Hope this helps. We are neither guaranteeing its completeness or accuracy. Reader discretion is advised.
P.S.
All the code has been taken from the Microsoft official Documentation.