
Architecting for Machine Learning involves many moving parts. From Machine Learning System Design, we know that ML Lifecycle is broadly categorized into two workflows viz. Training and Serving workflows. And, both of them have different Infrastructure and Compute requirements. Out of this, Model Serving, especially real-time serving could be more unpredictable. Hence, Machine Learning Architects must determine the appropriate compute options for Model Deployment. This is where Machine Learning Model Profiling comes in handy. Fortunately, tools like Azure Machine Learning Model Profiling exist. We will see an example of the same in this article.
Also Read: Managed Online Endpoints in Azure Machine Learning
Pre-Requisite
To perform Model Profiling, a key pre-requisite is a registered model. Model Registration happens in the Training workflow. To know how to register a model in Azure Machine Learning, read our article on Azure Machine Learning Pipelines for Model Training. Or else, if you want to use Azure Databricks to register a model in Azure ML, read our article on how Azure Databricks and Azure Machine Learning make a great pair. Nonetheless, we will use the same California Housing Model registered in the latter article.
Connect to the Workspace
Open the Jupyter Notebook in Azure Machine Learning Compute Instance and run the following command:
import azureml.core
from azureml.core import Workspace

# Load the workspace from the saved config file
ws = Workspace.from_config()
print('Ready to use Azure ML {} to work with {}'.format(azureml.core.VERSION, ws.name))
Create Sample Dataset for Profiling
Firstly, to perform Machine Learning Model Profiling, and to gauge its compute requirements, we need to provide it with some data. Here is a script that converts a sample data into a dataset:
import json
from azureml.core import Datastore
from azureml.core.dataset import Dataset
from azureml.data import dataset_type_definitions

input_json = {

                 'data': [
                             [8.1, 41,4.04, 1.2, 900.0, 3.560606, 37.50, -127.00],
                                   [1.5603, 25, 5.045455, 1.133333, 845.0, 2.560606, 39.48, -121.09]
                         ]
             }
# create a string that can be utf-8 encoded and
# put in the body of the request


serialized_input_json = json.dumps(input_json)
dataset_content = []


for i in range(100):
     dataset_content.append(serialized_input_json)


dataset_content = '\n'.join(dataset_content)
file_name = 'cfl_sample_request_data.txt'
f = open(file_name, 'w')
f.write(dataset_content)
f.close()

# upload the txt file created above to the Datastore and create a dataset from it
data_store = Datastore.get_default(ws)
data_store.upload_files(['./' + file_name], target_path='cfl_sample_request_data')
datastore_path = [(data_store, 'cfl_sample_request_data' +'/' + file_name)]


sample_request_data = Dataset.Tabular.from_delimited_files(datastore_path, separator='\n',
                                                           infer_column_types=True,
                                                           header=dataset_type_definitions.PromoteHeadersBehavior.NO_HEADERS)


sample_request_data = sample_request_data.register(workspace=ws,
                                                   name='cfl_sample_request_data',
                                                   create_new_version=True)
Create a Scoring Script and Environment
Additionally, to perform Machine Learning Model Profiling, you need a Scoring Script and an Environment. A scoring script has two functions viz. init() and run(). The init function loads a registered model to be scored against, while the run executes the scoring logic. Besides, the Environment comprises the details of scoring dependencies like the libraries. Here is the scoring script:
import os
import json
import numpy as np
import pandas as pd
import sklearn
import joblib
from azureml.core.model import Model

columns = ['MedInc', 'HouseAge', 'AveRooms', 'AveBedrms', 'Population', 'AveOccup','Latitude','Longitude']


def init():
    global model
    model_filename = 'california-housing.pkl'
    model_path = os.path.join(os.environ['AZUREML_MODEL_DIR'], model_filename)
    model = joblib.load(model_path)

def run(input_json):
    # Get predictions and explanations for each data point
    inputs = json.loads(input_json)
    data_df = pd.DataFrame(np.array(inputs['data']).reshape(-1, len(columns)), columns = columns)
    # Make prediction
    predictions = model.predict(data_df)
    # You can return any data type as long as it is JSON-serializable
    return {'predictions': predictions.tolist()}
Moreover, here are the Environment details. As far as the environment is concerned, either you can use a pre-built one or a custom one. In Azure Machine Learning, you can define your custom environments and register the same in the AML workspace. In this example, we use a custom environment. Run the following script, in the azure machine learning compute instance jupyter notebooks, to create an environment: This script creates and registers an environment.
from azureml.core import Workspace
from azureml.core import Environment
from azureml.core.environment import CondaDependencies

ws=Workspace.from_config()
my_env_name="california-housing-env"
myenv=Environment.get(workspace=ws, name='AzureML-Minimal').clone(my_env_name)
conda_dep=CondaDependencies()
conda_dep.add_pip_package("numpy==1.18.1")
conda_dep.add_pip_package("pandas==1.1.5")
conda_dep.add_pip_package("joblib==0.14.1")
conda_dep.add_pip_package("scikit-learn==0.24.1")
conda_dep.add_pip_package("sklearn-pandas==2.1.0")
conda_dep.add_pip_package("azure-ml-api-sdk")
myenv.python.conda_dependencies=conda_dep
print("Review the deployment environment.")
my_env_name=myenv
# Register the environment
my_env_name.register(workspace=ws)
Perform Model Profiling
Lastly, we perform Model Profiling. However, you need to add the scoring script to an appropriate location. Moreover, you need to retrieve the custom environment created in the previous step. In our example, we create a location named online-deployment/California-Housing/.
Having said that, here is the script:
import os
from azureml.core.model import InferenceConfig, Model
from azureml.core.dataset import Dataset
from azureml.core import Environment

folder_name = 'online-deployment/California-Housing/'
script_file = os.path.join(folder_name,"score.py")

myenv = Environment.get(ws,'california-housing-env')

model = Model(ws, name="california-housing-prices")
inference_config = InferenceConfig(entry_script=script_file,
environment=myenv)

input_dataset = Dataset.get_by_name(workspace=ws, name='cfl_sample_request_data')

profile = Model.profile(ws,
'cal-housing-profile',
[model],
inference_config,
input_dataset=input_dataset)

profile.wait_for_completion(True)

# see the result
details = profile.get_details()
First, let us view the results using the profile.get_details() object.
{'name': 'cal-housing-profile',
 'createdTime': '2022-05-12T13:19:51.705569+00:00',
 'state': 'Succeeded',
 'requestedCpu': 3.5,
 'requestedMemoryInGB': 15.0,
 'requestedQueriesPerSecond': 0,
 'maxUtilizedMemoryInGB': 0.230701056,
 'totalQueries': 100.0,
 'successQueries': 100.0,
 'successRate': 100.0,
 'averageLatencyInMs': 31.9507,
 'latencyPercentile50InMs': 31.37,
 'latencyPercentile90InMs': 37.78,
 'latencyPercentile95InMs': 38.5,
 'latencyPercentile99InMs': 44.37,
 'latencyPercentile999InMs': 44.37,
 'maxUtilizedCpu': 0.338,
 'measuredQueriesPerSecond': 31.298218818367044,
 'recommendedMemoryInGB': 0.5,
 'recommendedCpu': 0.5}
Look at a few interesting details here. Firstly, it is the averageLatencyInMs i.e. average of the response time to a query. Next, we have measuredQueriesPerSecond. It is the number of queries sent to the model every second. Besides, we have maxUtilizedMemoryInGB and maxUtilizedCpu, which are self-explanatory. At last, we have recommendedMemoryInGB and recommendedCpu; self-explanatory again.
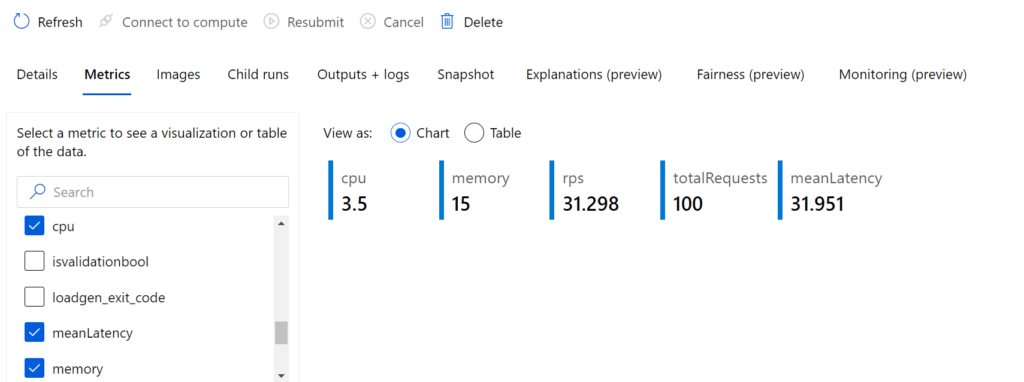
You can also view the results of your Machine Learning Model Profiling in the Azure portal, under the Experiments > cal-housing-profile-ModelProfile section, and select the metrics that interest you.
Conclusion
Model profiling is a handy tool for Architects and ML Engineers to design the serving workflow. However, it has a limitation that the Azure ML ACR cannot be behind a VNET. We recommend you read the official Microsoft Documentation before trying this out. Lastly, this is only for information. We do not claim any guarantees regarding its accuracy or completeness.