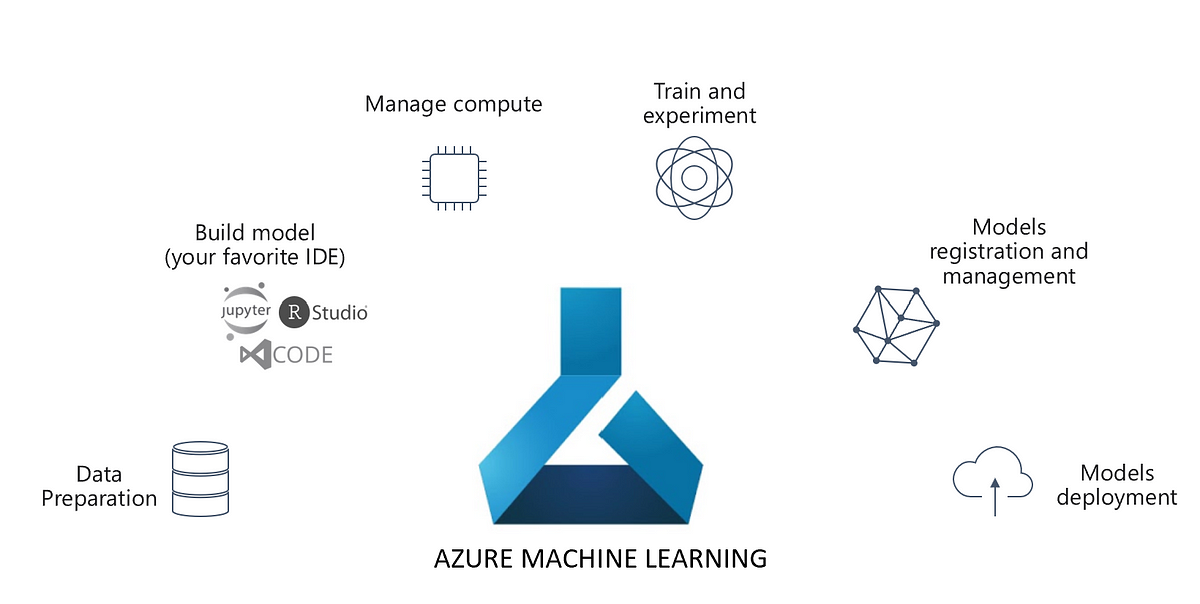
With AI becoming mainstream, automation of ML workflows is becoming critical. This includes automation of Training, Deployment and Inference of ML Models. These Machine Learning workflows are orchestrated by Machine Learning Pipelines. In this article, we will build Machine Learning Pipelines in Microsoft Azure Machine Learning.
However, before we move ahead, we recommend you to read through our article on Explainable Machine Learning with Azure Machine Learning. In that article, we introduced some key concepts like Experiments, ScriptRunConfig, Environments and Computes. In this article, we will introduce the concepts of Datastores, Datasets and Training Pipelines. Lastly, we will show how to publish and schedule your training pipelines.
However, before that, let’s see what do we mean by a pipeline in Machine Learning. To put it simple words, a Machine Learning Pipeline is a workflow to automate the parts or the whole of Machine Learning Lifecycle. Broadly, Machine Learning Lifecycle comprises Training, Deployment and Inference. They can be classified into two different workflows viz. Training and Inferencing.
The training workflow comprises the following steps:
- Data Extraction
- Data Preprocessing
- Hyperparameter tuning
- Model Building
- Evaluation
- Model Registration
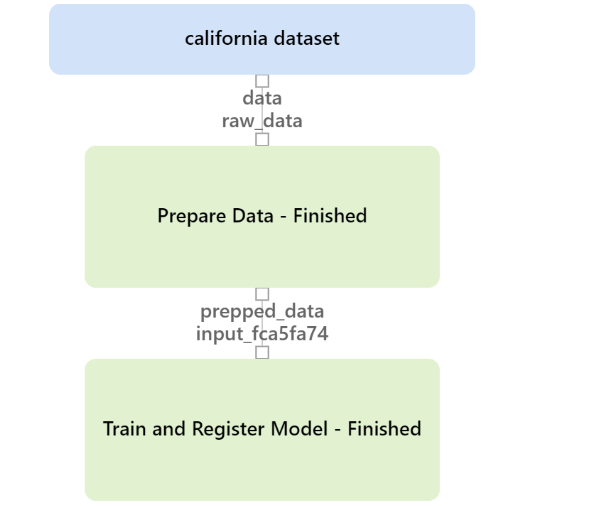
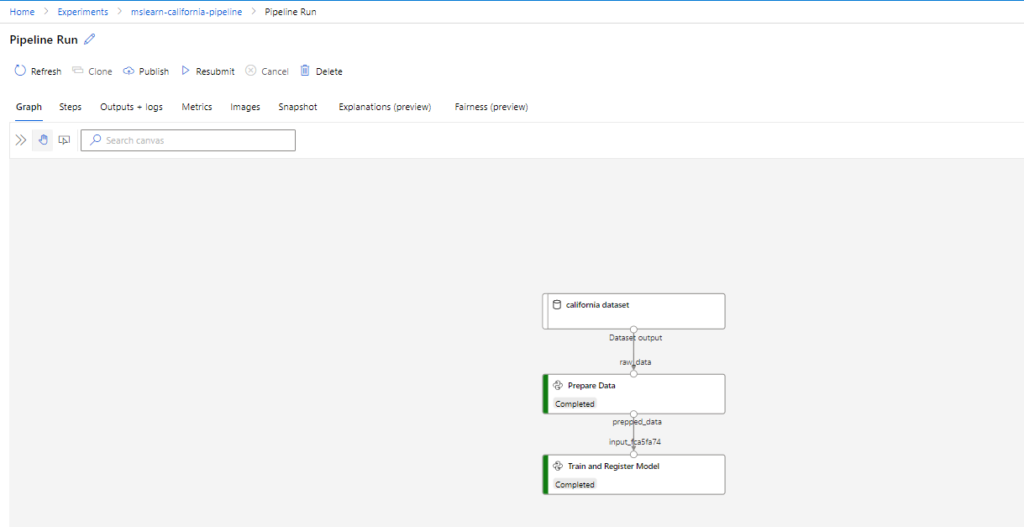
To keep it simple, we won’t perform Hyperparameter Tuning. Moreover, we will cover it in another article. Thus, our broad steps will be Data Extraction, Data Preparation and Model Training and Registration. To motivate you, here is how the pipeline would look like after you build it.
Datastores and Datasets
The first step of any Machine Learning pipeline is data extraction and preparation. In the Azure Machine Learning, working with data is enabled by Datastores and Datasets.
Datastores are the abstractions in Azure Machine Learning for cloud data sources like Azure Data Lake, Azure SQL Database, etc. Moreover, there are some built-in data stores in the Azure Machine Learning. To put it simply, Datastores are linked services to data sources, in AML. Datasets, on the other hand are the data objects from the datastores. They are like a view on top of the data present in these stores.
In our use case, we intend to use the california dataset of scikit-learn. Hence, for demonstration purpose, we will follow the below steps:
- Load California housing dataset.
- Load workspaceblobstore, the built in datastore of Azure Machine Learning.
- Upload the california housing dataset as a csv in workspaceblobstore
- Register a dataset using the csv.
But before that, let’s connect to Azure ML workspace and create a folder for the california housing experiment.
import azureml.core
from azureml.core import Workspace

# Load the workspace from the saved config file
ws = Workspace.from_config()
print('Ready to use Azure ML {} to work with {}'.format(azureml.core.VERSION, ws.name))
Folder creation:
import os
# Create a folder for the pipeline step files
experiment_folder = 'california_pipeline'
os.makedirs(experiment_folder, exist_ok=True)

print(experiment_folder)
Here is the script to create and register the dataset using the default workspaceblobstore:
import pandas as pd
from azureml.core import Dataset
from sklearn.datasets import fetch_california_housing

default_ds = ws.get_default_datastore()

if 'california dataset' not in ws.datasets:

# Register the tabular dataset
   try:
      california_housing = fetch_california_housing()
      pd_df_california_housing = pd.DataFrame(california_housing.data, columns = california_housing.feature_names)
      pd_df_california_housing['target'] = pd.Series(california_housing.target)

      local_path = experiment_folder+'/california.csv'
      pd_df_california_housing.to_csv(local_path)

      datastore = ws.get_default_datastore()

      # upload the local file from src_dir to the target_path in datastore
      datastore.upload(src_dir=experiment_folder, target_path=experiment_folder)

       california_data_set = Dataset.Tabular.from_delimited_files(datastore.path(experiment_folder+'/california.csv'))

      try:
         california_data_set = california_data_set.register(workspace=ws,
                                                            name='california dataset',
                                                            description='california data',
                                                            tags = {'format':'CSV'},
                                                            create_new_version=True)
         print('Dataset registered.')

      except Exception as ex:
         print(ex)

         print('Dataset registered.')

    except Exception as ex:
       print(ex)

else:
print('Dataset already registered.')
The Data Preparation Script
Having defined the datastores and datasets, let’s create the script for data preparation called prep_california.py.
%%writefile $experiment_folder/prep_california.py
# Import libraries
import os
import argparse
import pandas as pd
from azureml.core import Run
from sklearn.preprocessing import MinMaxScaler

# Get parameters
parser = argparse.ArgumentParser()
parser.add_argument("--input-data", type=str, dest='raw_dataset_id', help='raw dataset')
parser.add_argument('--prepped-data', type=str, dest='prepped_data', default='prepped_data', help='Folder for results')
args = parser.parse_args()
save_folder = args.prepped_data

# Get the experiment run context
run = Run.get_context()

# load the data (passed as an input dataset)
print("Loading Data...")
california = run.input_datasets['raw_data'].to_pandas_dataframe()

# Log raw row count
row_count = (len(california))
run.log('raw_rows', row_count)

# remove nulls
california = california.dropna()

# Normalize the numeric columns
scaler = MinMaxScaler()
num_cols = ['MedInc','HouseAge','AveRooms','AveBedrms','Population','AveOccup','Latitude','Longitude']
california[num_cols] = scaler.fit_transform(california[num_cols])

# Log processed rows
row_count = (len(california))
run.log('processed_rows', row_count)

# Save the prepped data
print("Saving Data...")
os.makedirs(save_folder, exist_ok=True)
save_path = os.path.join(save_folder,'california_data.csv')
california.to_csv(save_path, index=False, header=True)

# End the run
run.complete()
The Model Training Script
As we saw in the pipeline above, the last step is the model training and registration. Hence, here is our Model training and registration script:
%%writefile $experiment_folder/train_california.py
# Import libraries
from azureml.core import Run, Model
import argparse
import pandas as pd
import numpy as np
import joblib
import os
from sklearn.model_selection import train_test_split
from xgboost import XGBRegressor
from sklearn.metrics import r2_score

# Get parameters
parser = argparse.ArgumentParser()
parser.add_argument("--training-data", type=str, dest='training_data', help='training data')
args = parser.parse_args()
training_data = args.training_data

# Get the experiment run context
run = Run.get_context()

# load the prepared data file in the training folder
print("Loading Data...")
file_path = os.path.join(training_data,'california_data.csv')
california = pd.read_csv(file_path)

# Separate features and labels
X, y = california[['MedInc','HouseAge','AveRooms','AveBedrms','Population','AveOccup','Latitude','Longitude']].values, california['target'].values

# Split data into training set and test set
X_train, X_test, y_train, y_test = train_test_split(X, y, test_size=0.30, random_state=0)

# Train a decision tree model
# Train a XgBoost model
print('Training a XgBoost model')
xgb = XGBRegressor(n_estimators=200, max_depth=5)
xgb.fit(X_train, y_train)

# calculate R2 Score
y_pred = xgb.predict(X_test)
test_r2_score = r2_score(y_test, y_pred)
print('R2 Score: ' + str(test_r2_score))

# Save the trained model in the outputs folder
print("Saving model...")
os.makedirs('outputs', exist_ok=True)
model_file = os.path.join('outputs', 'california_model.pkl')
joblib.dump(value=xgb, filename=model_file)

# Register the model
print('Registering model...')
Model.register(workspace=run.experiment.workspace,
model_path = model_file,
model_name = 'california_model',
tags={'Training context':'Pipeline'},
properties={'R2 Score': np.float(test_r2_score)})


run.complete()
Prepare a compute environment for the pipeline steps
Since we have all the steps in place, we can create a pipeline. However, to run it, we will create or reuse a compute cluster. Furthermore, we will define an environment for the same. Here is the script to create or reuse the compute cluster:
from azureml.core.compute import ComputeTarget, AmlCompute
from azureml.core.compute_target import ComputeTargetException

cluster_name = "<your-cluster-name>"

try:
   # Check for existing compute target
   pipeline_cluster = ComputeTarget(workspace=ws, name=cluster_name)
   print('Found existing cluster, use it.')
except ComputeTargetException:
   # If it doesn't already exist, create it
  try:
    compute_config = AmlCompute.provisioning_configuration(vm_size='STANDARD_DS11_V2', max_nodes=2)
    pipeline_cluster = ComputeTarget.create(ws, cluster_name, compute_config)
    pipeline_cluster.wait_for_completion(show_output=True)
  except Exception as ex:
    print(ex)
Besides, here is the script to create an environment:
%%writefile $experiment_folder/pipeline_env.yml
name: pipeline_env
dependencies:
- python=3.6.2
- scikit-learn
- xgboost
- pandas
- joblib
- pip
- pip:
   - azureml-defaults
   - azureml-interpret
With that in place, let’s create a run configuration for the pipeline:
from azureml.core import Environment
from azureml.core.runconfig import RunConfiguration

# Create a Python environment for the experiment (from a .yml file)
pipeline_env = Environment.from_conda_specification("pipeline_env", experiment_folder + "/pipeline_env.yml")

# Register the environment
pipeline_env.register(workspace=ws)
registered_env = Environment.get(ws, 'pipeline_env')

# Create a new runconfig object for the pipeline
pipeline_run_config = RunConfiguration()

# Use the compute you created above.
pipeline_run_config.target = pipeline_cluster

# Assign the environment to the run configuration
pipeline_run_config.environment = registered_env

print ("Run configuration created.")
Create and run a Machine Learning pipeline
With all the elements in place, let’s create the pipeline steps:
from azureml.data import OutputFileDatasetConfig
from azureml.pipeline.steps import PythonScriptStep

# Get the training dataset
california_ds = ws.datasets.get("california dataset")

# Create an OutputFileDatasetConfig (temporary Data Reference) for data passed from step 1 to step 2
prepped_data = OutputFileDatasetConfig("prepped_data")

# Step 1, Run the data prep script
prep_step = PythonScriptStep(name = "Prepare Data",
source_directory = experiment_folder,
script_name = "prep_california.py",
arguments = ['--input-data', california_ds.as_named_input('raw_data'),
'--prepped-data', prepped_data],
compute_target = pipeline_cluster,
runconfig = pipeline_run_config,
allow_reuse = True)

# Step 2, run the training script
train_step = PythonScriptStep(name = "Train and Register Model",
source_directory = experiment_folder,
script_name = "train_california.py",
arguments = ['--training-data', prepped_data.as_input()],
compute_target = pipeline_cluster,
runconfig = pipeline_run_config,
allow_reuse = True)

print("Pipeline steps defined")
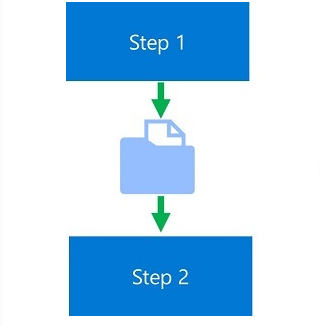
Note the variable named prepped_data. This is the object that will hold the intermediate data after preprocessing by the script prep_california.py. Furthermore, the intermediate data is then passed to the Step 2 i.e. model training, as an argument as shown in the below image:
Finally, with the pipeline steps defined, let’s create a Pipeline object to run the pipeline steps.
from azureml.core import Experiment
from azureml.pipeline.core import Pipeline
from azureml.widgets import RunDetails

# Construct the pipeline
pipeline_steps = [prep_step, train_step]
pipeline = Pipeline(workspace=ws, steps=pipeline_steps)
print("Pipeline is built.")

# Create an experiment and run the pipeline
experiment = Experiment(workspace=ws, name = 'mslearn-california-pipeline')
pipeline_run = experiment.submit(pipeline, regenerate_outputs=True)
print("Pipeline submitted for execution.")
RunDetails(pipeline_run).show()
pipeline_run.wait_for_completion(show_output=True)
To view the pipeline run in the Azure portal, go to Experiments > mslearn-california-pipeline> latest-run. Rename the latest run with any name of your choice.
Publish the Machine Learning pipeline
Once the pipeline is created and tested, you can publish it as a REST endpoint. Here is the script to do so:
# Publish the pipeline from the run
published_pipeline = pipeline_run.publish_pipeline(
name="california-training-pipeline", description="Trains California Housing model", version="1.0")
This published pipeline can either be called invoking the rest endpoint via HTTP POST or by scheduling the pipeline. Here is the script to invoke the REST endpoint:
from azureml.core.authentication import InteractiveLoginAuthentication

interactive_auth = InteractiveLoginAuthentication()
auth_header = interactive_auth.get_authentication_header()
print("Authentication header ready.")
import requests

experiment_name = 'mslearn-california-pipeline'

rest_endpoint = published_pipeline.endpoint
response = requests.post(rest_endpoint,
headers=auth_header,
json={"ExperimentName": experiment_name})
run_id = response.json()["Id"]
run_id
Besides, you can schedule the pipeline:
from azureml.pipeline.core import ScheduleRecurrence, Schedule

# Submit the Pipeline every Monday at 00:00 UTC
recurrence = ScheduleRecurrence(frequency="Week", interval=1, week_days=["Monday"], time_of_day="00:00")
weekly_schedule = Schedule.create(ws, name="weekly-california-housing-training",
description="Based on time",
pipeline_id=published_pipeline.id,
experiment_name='mslearn-diabetes-pipeline',
recurrence=recurrence)
print('Pipeline scheduled.')
Conclusion
This is a very simple example of how to build a Machine Learning Pipeline for model training in Azure ML. More nuances like Hyperparameter tuning could be added. Lastly, please note that this is for information. We don’t claim any guarantees regarding its completeness or accuracy.
Featured Image credit . Algorithmia