Introducing SSIS
In the Microsoft Sql Server Integration services (SSIS), we have a variety of tasks to perform ETL. However, with changing data landscape and newer tools like Azure Data Factory, the world is moving fast towards ELT from ETL. Having said that, we need to enable slow transition from ETL to ELT for existing SSIS users. The first step towards that is making SSIS metadata independent. But prior to that, we need to introduce the project structure of SSIS and a few tasks, before proceeding to make SSIS metadata independent
SSIS projects and packages
The fundamental unit of an SSIS job is a package (.dtsx), which is contained in a project/solution. Before that, you need to have Sql Server and Sql server Data tools, a visual studio shell. Personally, I would recommend SQL server 2017 and SSDT 2017. Furthermore, another important piece of software to install is SSMS.
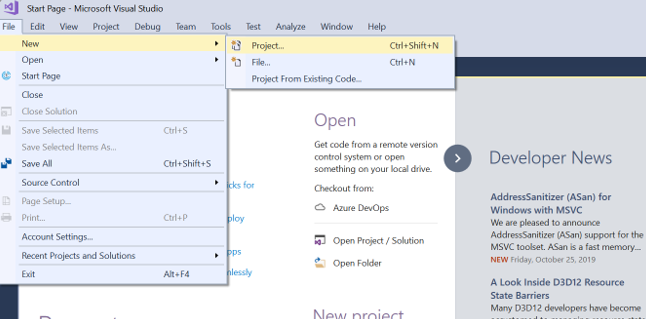
Once you have all the infrastructure setup, open SSDT and create a new project/solution as shown below.
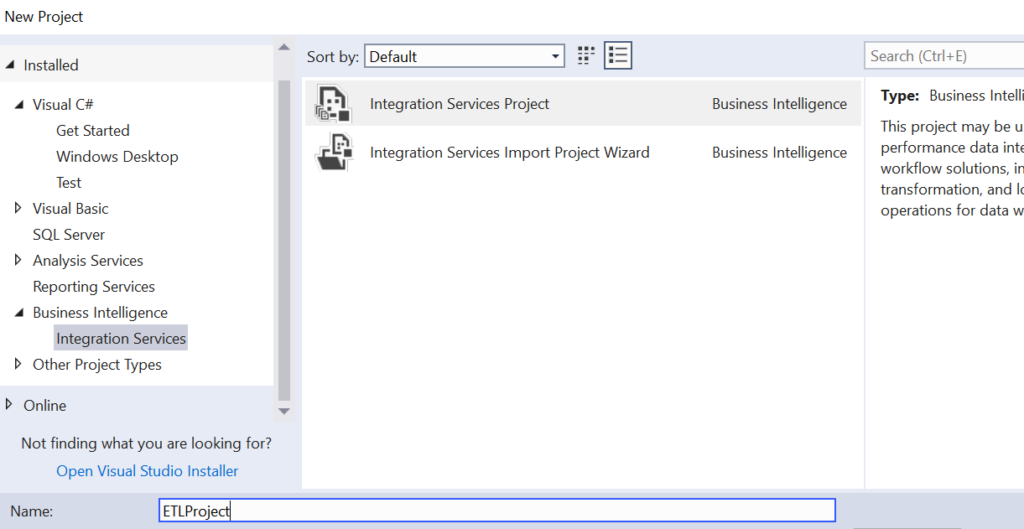
Select Business Intelligence>Integration Services. Type in an appropriate name.
You can see the project structure to the extreme right of the visual studio window.

You can see the SSIS Packages section in the above image. Right-click on it and create a new package with an appropriate name.
The SSIS control flow
In a new SSIS Package, we have multiple sections including the Control Flow and Data Flow. The Control Flow is the central flow which glues multiple tasks like Data Flow, Execute SQL tasks etc.

The Data Flow Task
The Data Flow task (DFT) is the central task in SSIS. It enables us to perform ETL. It consists of a source connection, multiple transformations and a final destination to load the data. For demonstration purposes, let’s create a table DimEmployee using AdventureWorks Database. We can load this using a simple DFT as follows. Furthermore, we will point you to another article which uses the DFT along with a transformation.
Let us take the table HumanResources.employee from AdventureWorks2017 and load it as DimEmployee in AdventureWorks2017, with a simple transformation. The source structure of the HumanResources.Employee looks as follows.
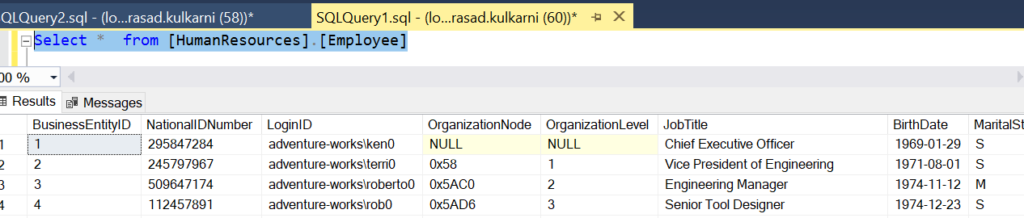
The structure is as follows:
CREATE TABLE [HumanResources].[Employee](
[BusinessEntityID] [int] NOT NULL,
[NationalIDNumber] [nvarchar](15) NOT NULL,
[LoginID] [nvarchar](256) NOT NULL,
[OrganizationNode] [hierarchyid] NULL,
[OrganizationLevel] AS ([OrganizationNode].[GetLevel]()),
[JobTitle] [nvarchar](50) NOT NULL,
[BirthDate] [date] NOT NULL,
[MaritalStatus] [nchar](1) NOT NULL,
[Gender] [nchar](1) NOT NULL,
[HireDate] [date] NOT NULL,
[SalariedFlag] [dbo].[Flag] NOT NULL,
[VacationHours] [smallint] NOT NULL,
[SickLeaveHours] [smallint] NOT NULL,
[CurrentFlag] [dbo].[Flag] NOT NULL,
[rowguid] [uniqueidentifier] ROWGUIDCOL NOT NULL,
[ModifiedDate] [datetime] NOT NULL
)
We will load this data into the following table at the sink.
CREATE TABLE [newdw.DimEmployee](
	[BusinessEntityID] [int] NOT NULL,
	[NationalIDNumber] [nvarchar](15) NOT NULL,
	[JobTitle] [nvarchar](50) NOT NULL,
	[BirthDate] [date] NOT NULL,
	[MaritalStatus] [nchar](1) NOT NULL,
	[Gender] [nchar](1) NOT NULL,
	[HireDate] [date] NOT NULL,
	[SalariedFlag] [Varchar](10) NOT NULL,
	[VacationHours] [smallint] NOT NULL,
	[SickLeaveHours] [smallint] NOT NULL,
	[Unavailability] [int] NOT NULL
)
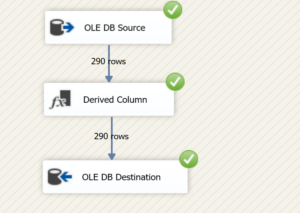
Let us create the Data Flow Task which will load the data from source to destination with the additional column name Unavailability which will be the sum of VacationHours and SickLeaveHours. Let us walk through the steps to create this simple DFT.
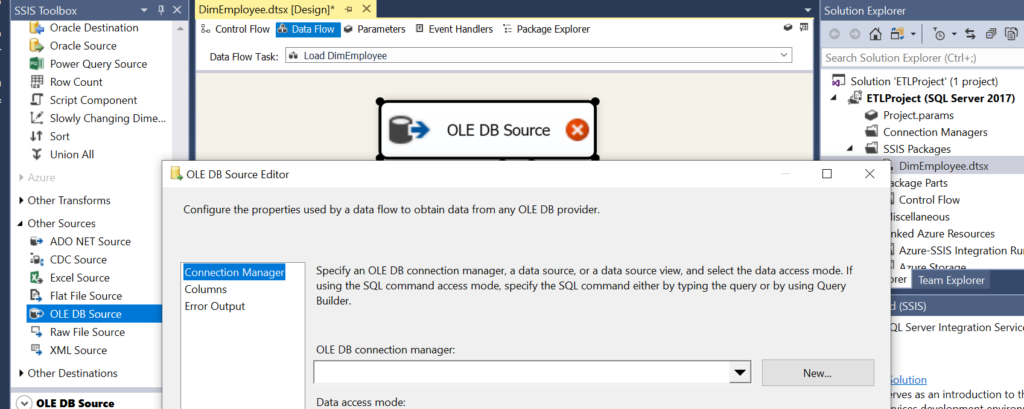
Step 1: Source connection
The first step here is connecting to the source i.e. AdventureWorks2017. Let us pull out a DFT named DimEmployee.

Double click on the DFT and pull out an OleDb source.
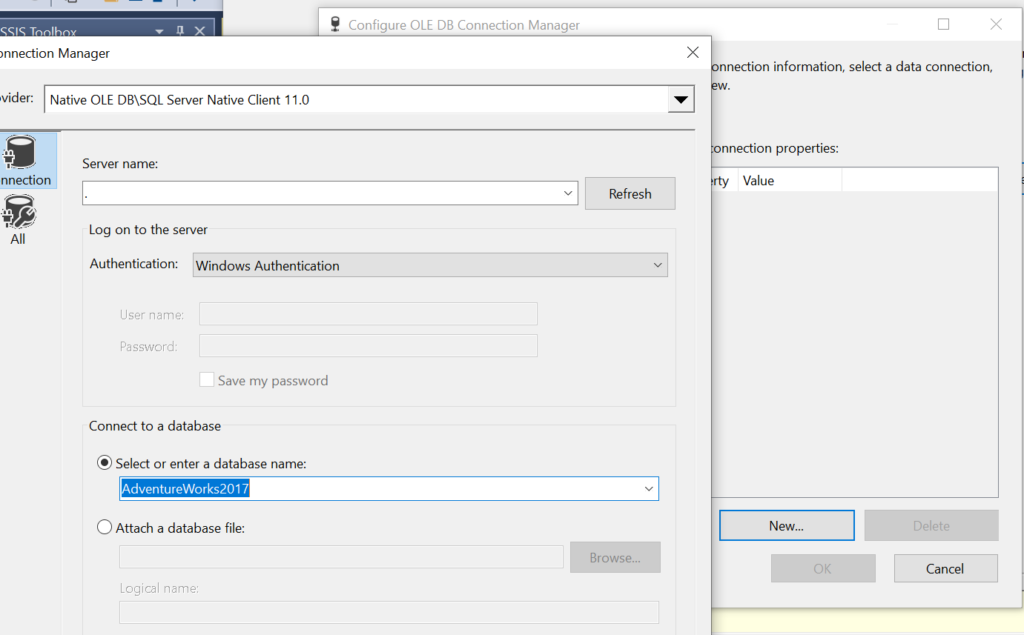
Click on the New icon and connect to the local AdventureWorks2017 database.
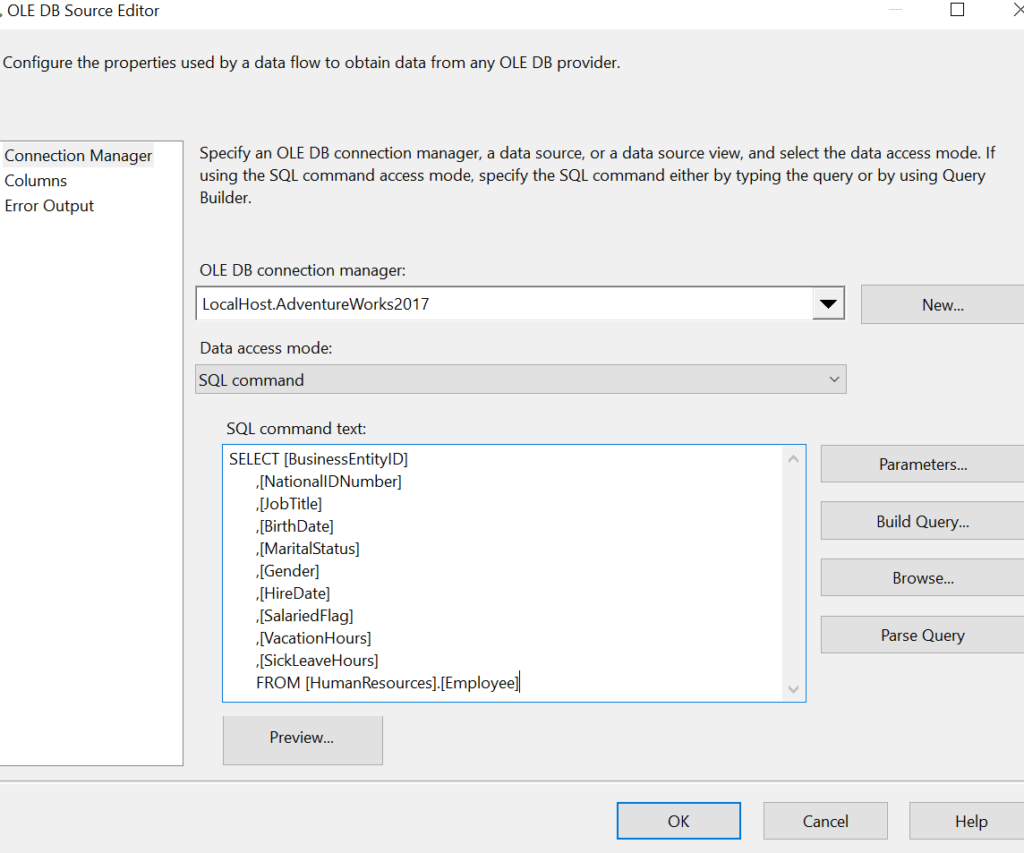
Once the connection is successful, you will get a connection manager window. Open the window and place the source query as shown below.
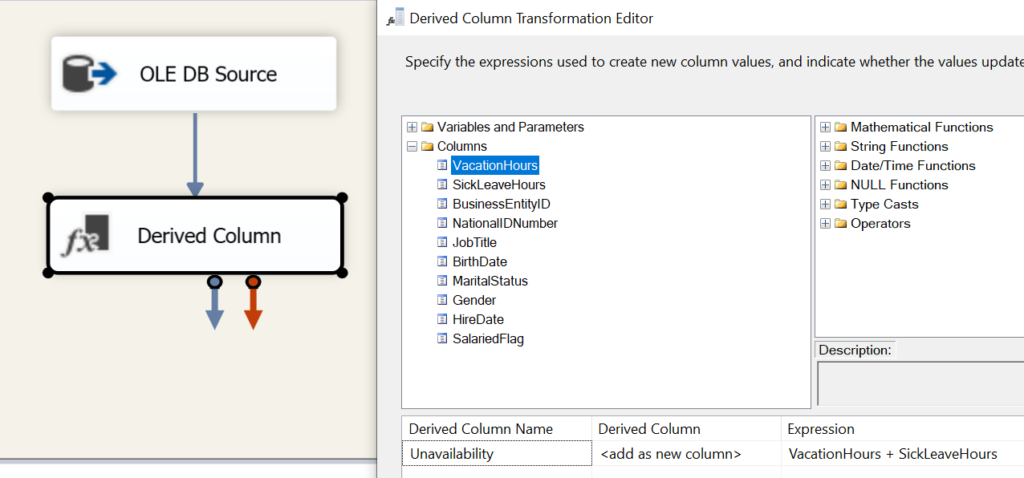
Step 2: Derived Column to transform data
As aforementioned, we will create a load a column called Unavailability, which will be a sum of the columns VacationHours and SickLeaveHours. Pull in Derived Column transformation and add a new column called Unavailability.
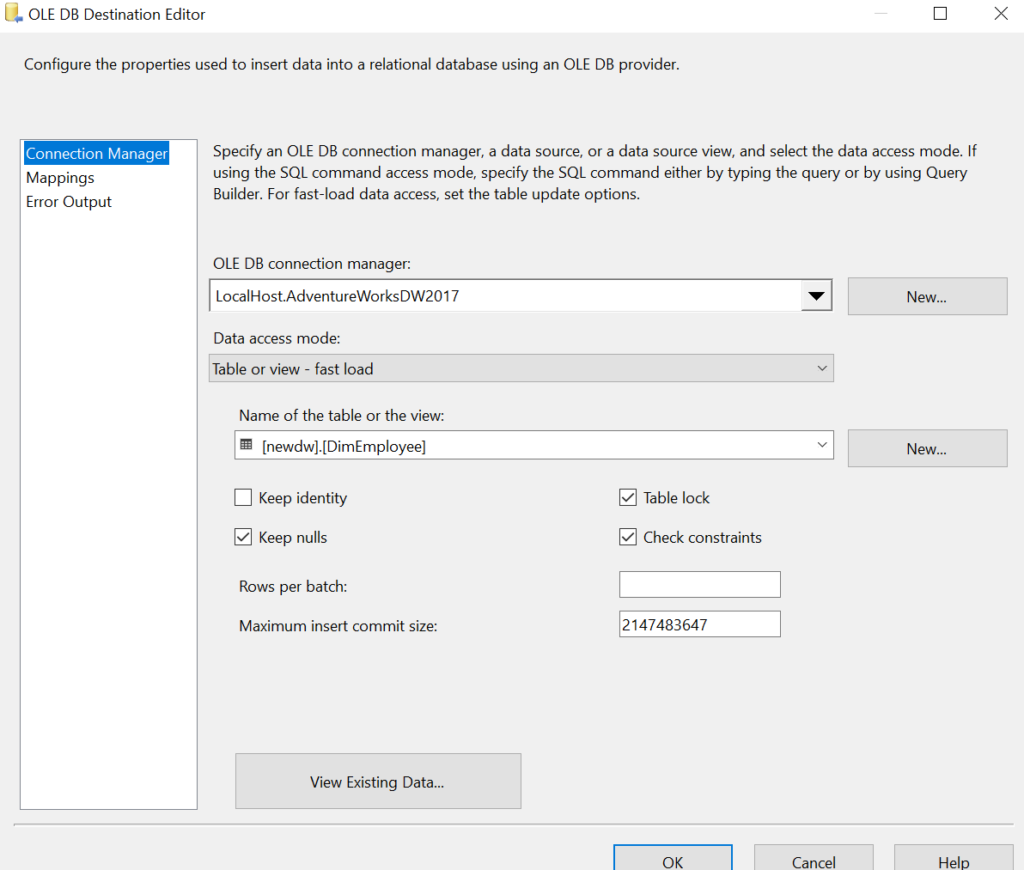
Step 3: Loading Destination
Finally, we load the destination i.e. DimEmployee. The destination configuration looks as follows.
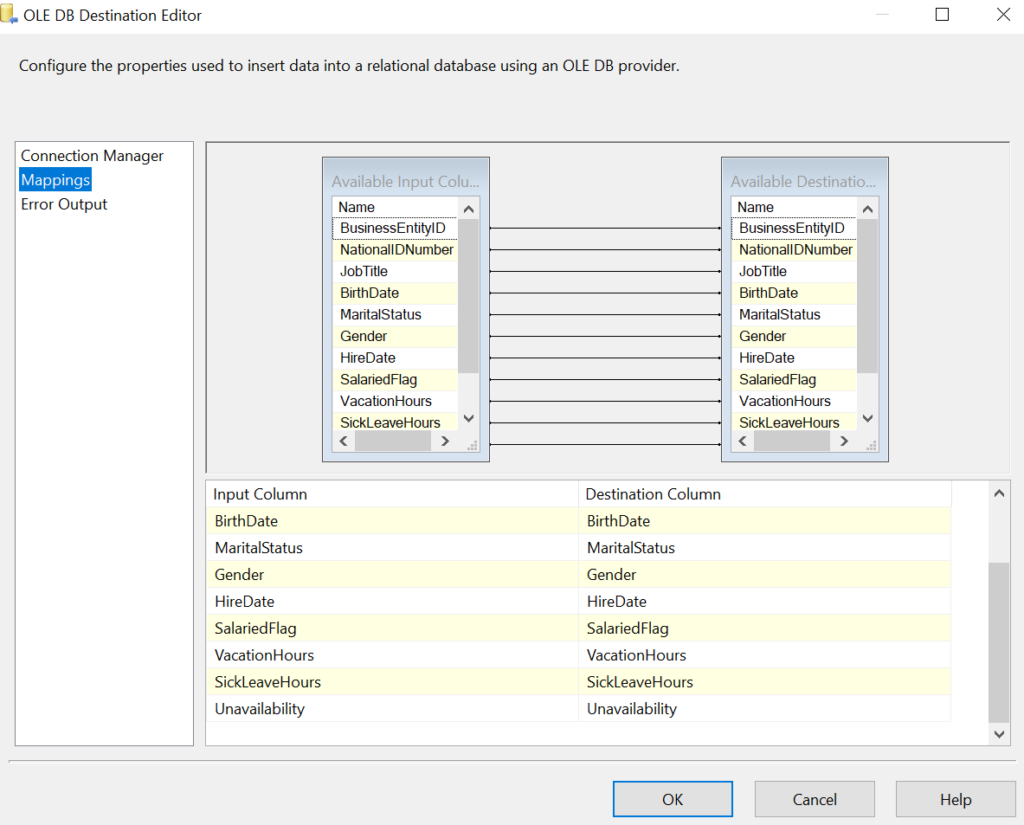
Here is the mapping.
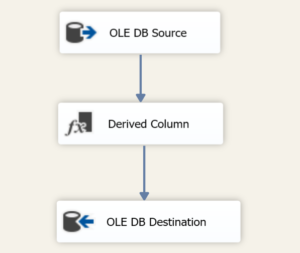
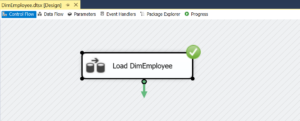
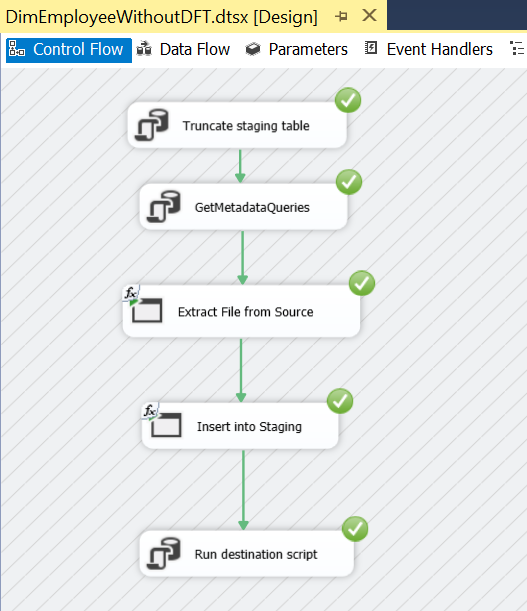
Finally, the completed DFT and package looks like this:
Let us run the SSIS Package.
Also read: Comparing SSIS Lookup and SQL Joins
The metadata dependence of SSIS
Although the green signals look beautiful and encouraging, this design does not scale out well. For instance, if there are 100 tables to be loaded in a Datawarehouse, we need 100 packages, since, the mapping from source to destination is pretty hardwired in a Data Flow Task. This requires serious consideration for an alternative since Data warehousing requirements are getting complex every day.
Furthermore, with evolving business requirements, deployment and maintenance for tons of packages and solutions get cumbersome. Hence, while working for a major NBFC client, we decided to get rid of the Data Flow Task. Please note that this is not an article to deride the Data Flow Task. It is a great component of SSIS packages. However, we are trying to bring forward an alternative way of thinking.
Approach to metadata independence
Now, in order to achieve metadata independence in SSIS, we need to store the metadata of the SSIS package in some other location. For instance, in the above scenario, we have to store the source query in a metadata table. Next, we have to find a way to extract data and insert it into an intermediate staging table for transformation. Finally, we need to have another metadata table(or the one used earlier) which runs a SQL statement on the staging table. This procedure loads the final destination table. Now, all these steps will be dynamic and will be controlled by a project parameter.

On a lighter note, I will use Andrew Ng’s famous line ‘Don’t worry about it if you don’t understand!’ We will build this package and introduce a few SSIS tasks while doing so. However, prior to that we will walk through the bcp utility.
BCP utility
Now, since we are dodging the DFT, an alternative way to extract and load the data. This can be achieved using the bulk copy (bcp) utility, which is a part of the SQL Server installation. This gives us easy command-line instructions to extract and load data from and to multiple databases. For more on bcp refer to this document.
The bcp command comes in three modes. Firstly, the ‘in’ mode which helps insert data from a file into a database table. Secondly, we have the ‘out’ mode, which enables us to extract data from a particular database table. Lastly, we have the ‘queryout’ mode enabling us to extract data using a SQL query rather than a table. For your reference, here is a bcp queryout script which extracts certain columns from HumanResources.Employee into a file, from the local AdventureWorks2017 database:
bcp "SELECT [BusinessEntityID],[NationalIDNumber],[JobTitle],[BirthDate],[MaritalStatus],[Gender],[HireDate],[SalariedFlag],[VacationHours],[SickLeaveHours] FROM [HumanResources].[Employee]" queryout "C:\Users\MyPC\Documents\Data\Employee.csv" -S . -d AdventureWorks2017 -c -t -T
Now, let us build a metadata independent system. As a part of that, we will introduce tasks like the Execute SQL task and Execute process task.
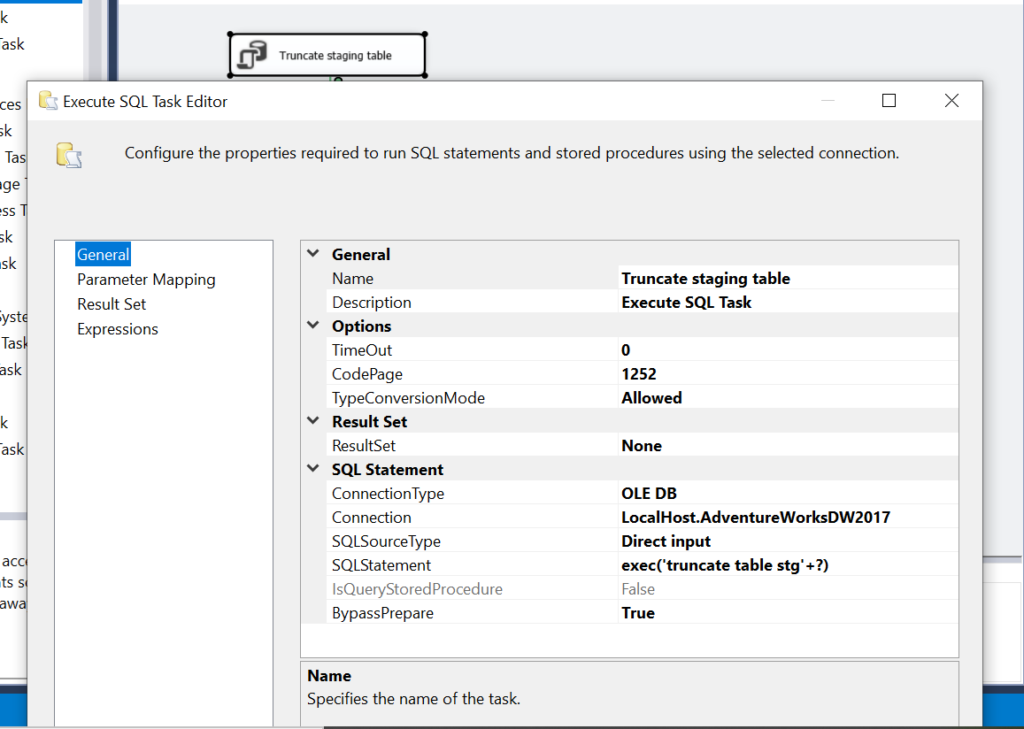
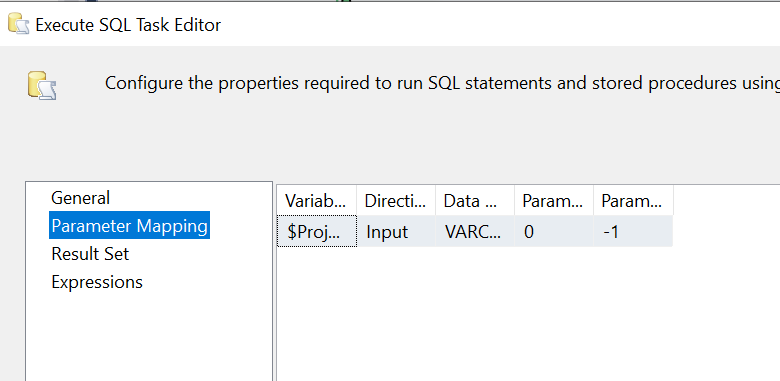
Step 1:Truncate Staging table using SSIS Execute SQL task
An Execute SQL task is used to run SQL statements in SSIS. This includes running a stored procedure. Moreover, results can be returned in a variable, which can be used in further steps of the orchestration. In the first step, we will fire a simple truncate statement on the staging table. This step accepts the project variable as a parameter. You can see that we have made the truncate table statement dynamic to facilitate the reuse of the package for multiple tables.
Please note that the structure of the staging table is similar to the bcp query which will be used to extract data from the source. In this example, we use the following structure.
CREATE TABLE [stgDimEmployee]
(
[BusinessEntityID] [int] NOT NULL,
[NationalIDNumber] [nvarchar](15) NOT NULL,
[JobTitle] [nvarchar](50) NOT NULL,
[BirthDate] [date] NOT NULL,
[MaritalStatus] [nchar](1) NOT NULL,
[Gender] [nchar](1) NOT NULL,
[HireDate] [date] NOT NULL,
[SalariedFlag] [Varchar](10) NOT NULL,
[VacationHours] [smallint] NOT NULL,
[SickLeaveHours] [smallint] NOT NULL,
)
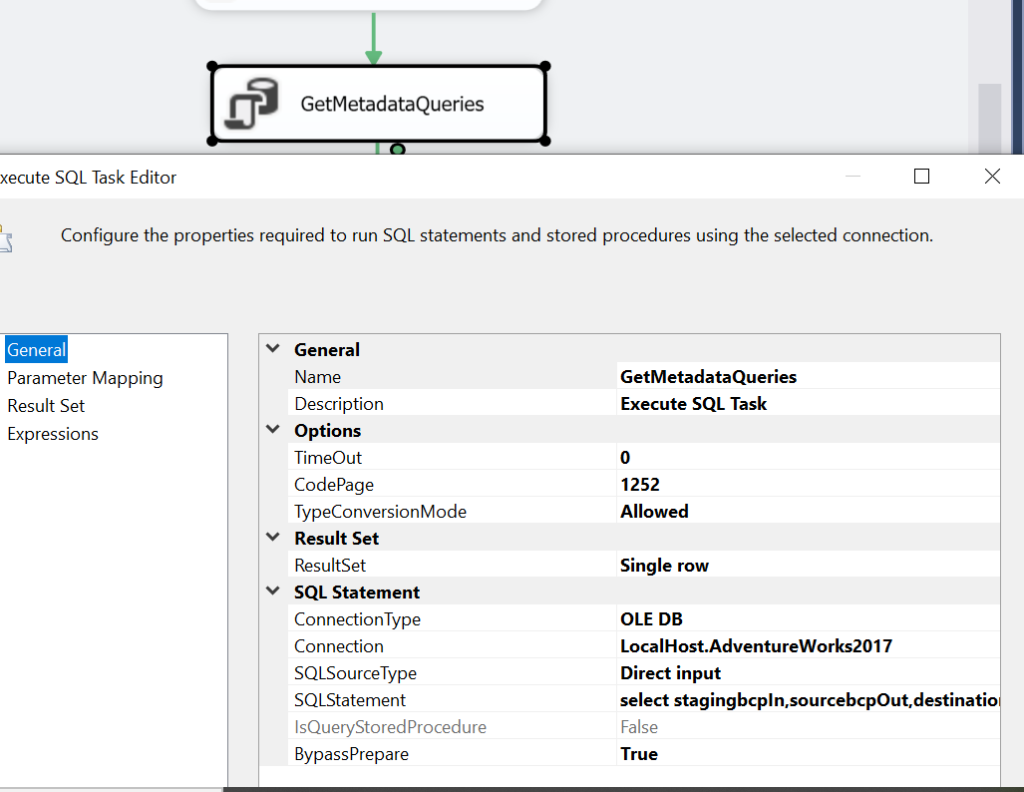
Step 2: Get Metadata Parameters
As discussed in the approach, we have a Metadata table to retrieve metadata values like the extraction script, the insertion script and the SQL script to load from staging to destination. The following script will give you an idea to create a metadata table. The first column holds the table name. The second column holds bcp queryout script to extract data in a file, while the third one holds the script to insert the extracted data into staging. Lastly, the destination query holds the SQL statement to load data from staging to the final table.
create table SSISMetadata
(
tableName varchar(100),
sourcebcpOut varchar(4000),
stagingbcpIn varchar(4000),
destinationQuery varchar(4000)
)
Furthermore, we will use the following insertion script to load the metadata table for our table newdw.DimEmployee in AdventureWorksDW2017.
insert into AdventureWorks2017..SSISMetadata VALUES ('DimEmployee', ' "SELECT [BusinessEntityID],[NationalIDNumber],[JobTitle],[BirthDate],[MaritalStatus],[Gender],[HireDate],[SalariedFlag],[VacationHours],[SickLeaveHours] FROM [HumanResources].[Employee]" queryout "C:\myfolder\DimEmployee.csv" -S . -d AdventureWorks2017 -c -t "|" -T',' stgDimEmployee in "C:\myfolder\DimEmployee.csv" -S . -d AdventureWorksDW2017 -c -t "|" -T
','INSERT INTO newdw.DimEmployee Select *,[VacationHours]+[SickLeaveHours] as Unavailability from stgDimEmployee')
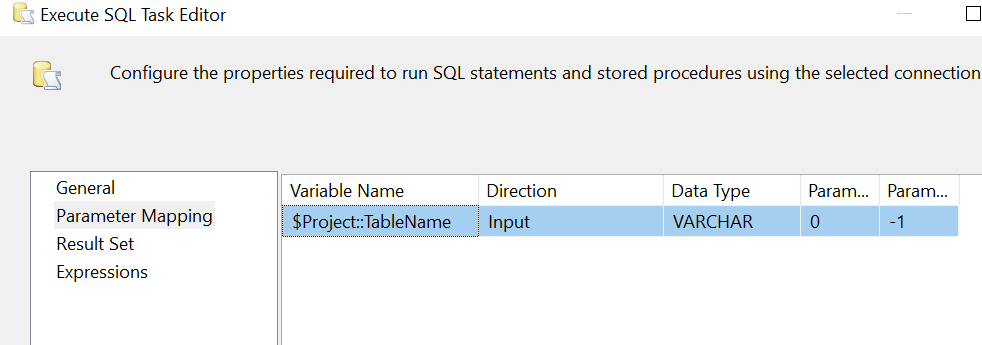
Parameter Mapping
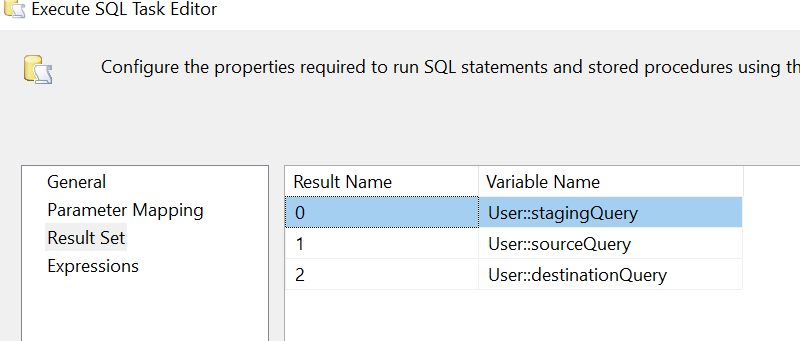
Result Set

Variables
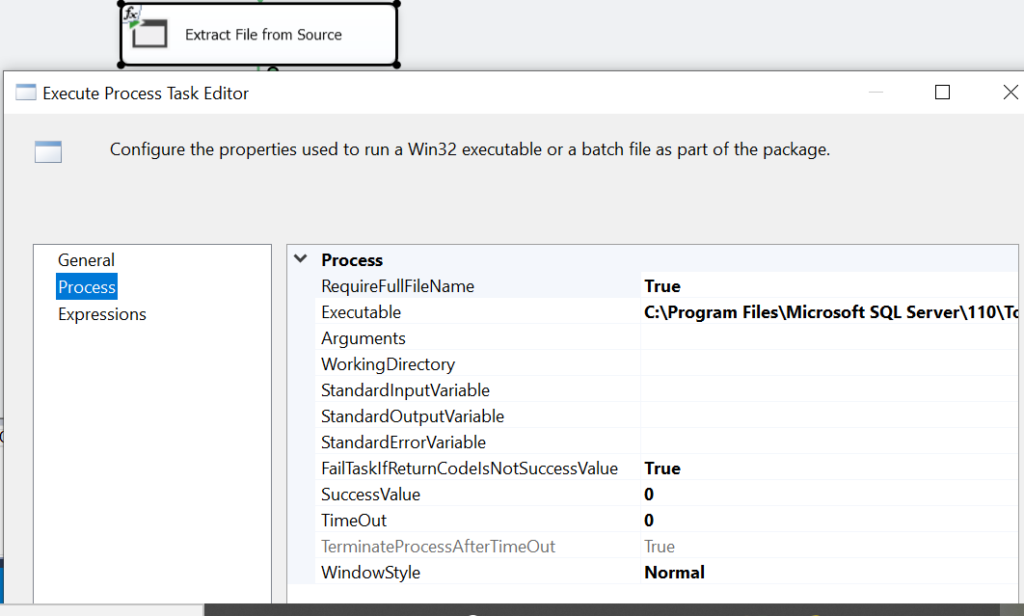
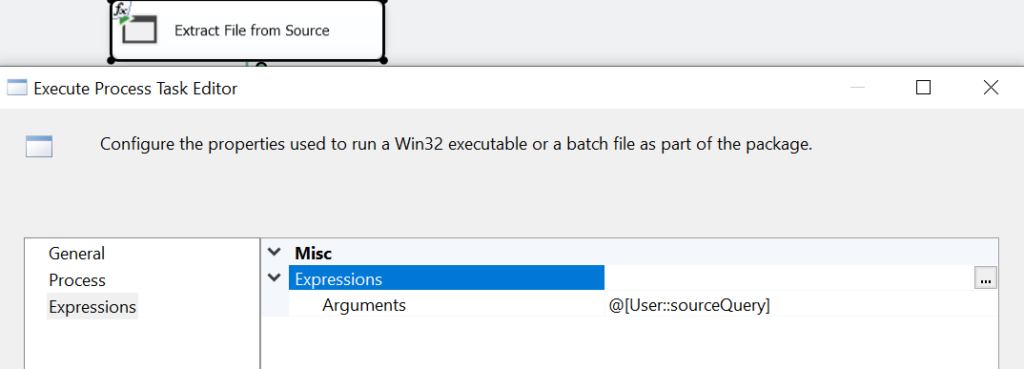
Step 3: Extract with bcp using Execute process task
Now, we will introduce another key task viz. Execute process task. It is generally used to leverage other application in our workflow. In this case, we would like to utilize a SQL Server utility named bcp.exe to extract files from the source server. Below is the path to bcp.exe in your system.
C:\Program Files\Microsoft SQL Server\110\Tools\Binn\bcp.exe
Step 4: Insert into staging with bcp using Execute process task
In this step, we use bcp in to upload the data extracted in the previous step, to the staging table. This step is similar to the previous one with a difference in Arguments. In this step, the variable stagingQuery is used instead of the sourceQuery.
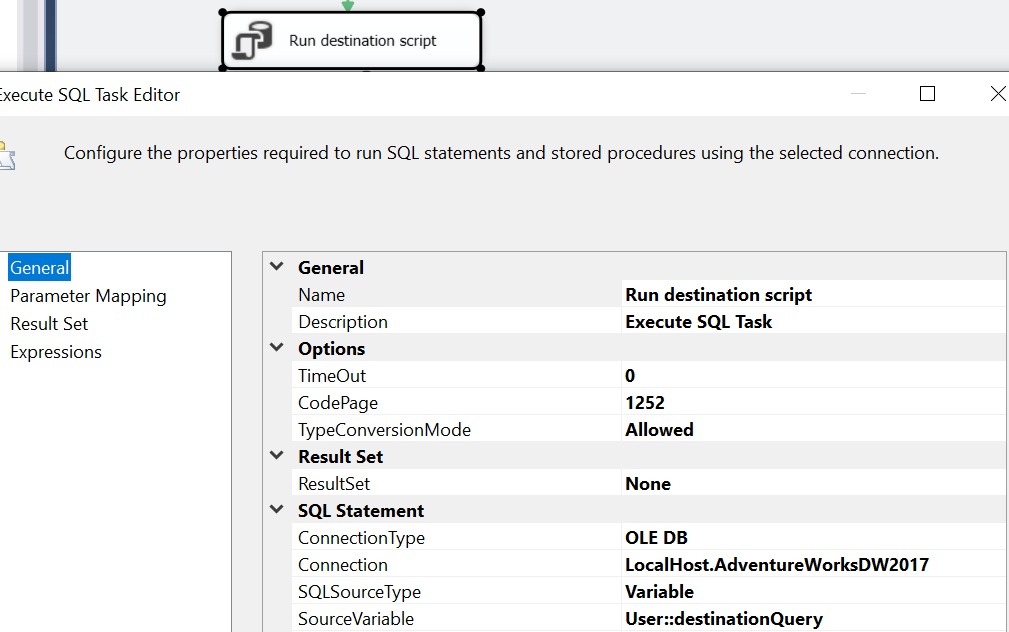
Step 5: Final insert into the table
Lastly, we invoke the SQL statement extracted as a parameter i.e. destinationQuery to perform the requisite transformation. In this query, we load the stgDimEmployee into newdw.DimEmployee in the AdventureworksDW 2017. Please note that we read this SQL statement dynamically from the metadata table.
INSERT INTO newdw.DimEmployee
Select *,[VacationHours]+[SickLeaveHours] as Unavailability from stgDimEmployee
Finally, we run the entire SSIS package for the satisfaction of green signals!
Conclusion
Hope that this article helps. We are sharing the GitHub link where you can find both the packages for you to try it for yourself.